Tuesday, December 14, 2010

Adventures in Polyurethane Mold Building Part 1.

I say adventure because I'm not sure this will turn out. Here is the bamboo tiki light I am attempting to turn into a concrete tiki light holder. I need to build a mold for the rubber (the easy part) and make the lamp water tight (the hard part).
Here we go, two part polyurethane used to make durable and reusable concrete stamps and molds. It's not cheap but if the mold turns out, I will be able to make a bunch of these to help defray the cost.
On the left the mold for the mold. On the right, the sealed tikiman. I backed the face area with masking tape and filled in the light bulb access and cord holes with molding clay.
Then I sprayed everything with a liberal shot of silicone mold release and glued them down. Per manufacturers suggestion there is 1/2inch between the mold and the tikiman. Once the polyurethane is set I will split it in two halves to remove the bamboo.
The silicone glue will have to set up at least a day before I can make a mess, I mean pour the mold.

Monday, December 13, 2010

Happenings in the Dr. Concrete World

The weather has turned cold and the miscellaneous outdoor projects that have been keeping me from concrete projects are wrapped up for the year.
Looking towards next year I've got a few fun projects in the works.
1. I now have the domain Dr. Concrete so everything will be migrating to www.drconcrete.net eventually. The website will be a mishmash of different services from consulting to countertops.
2. I will be experimenting with two part polyurethane molds for a couple neat projects. I have been toying around with the idea of making some Tiki torch holders. What better than a tiki to hold them. We got a tiki light as an early Christmas present. I'm going to attempt to turn that into a mold. Don't worry, the light isn't trademarked or copyrighted so I won't get in trouble.
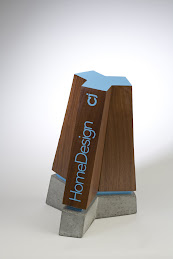
3. I'm teaming with again studiobuild to work on some concrete and wood trophies.
4. I'm doing a limited run of the planters to clear out the rest of the Ipe wood.
Stay tuned for more details.

Wednesday, October 27, 2010

Long Overdue

After finishing the patio table for our party I got busy with other things and haven't done much with concrete around the house. I have been doing lots of other concrete work, so I thought I would post some pictures. I do lots of work with pervious concrete. Pervious concrete allows the water to pass through to reduce stormwater runoff.
Last month we placed some experimental pervious concrete on campus to look at a few different mixtures and curing methods. The sidewalk was a difficult location so we ended up using a bobcat.
This pervious was self-consolidating and I finished a good portion with a mag float.
The surface before finishing.
Normally we never use a bull float on pervious, but this mixture was special.
Putting a fresh joint in with a pizza cutter.
The completed section. Some of the tests included curing under plastic and leaving some open. The infiltration was between 100-250 in./hr which is acceptable in this location.

Friday, June 4, 2010

Concrete Patio Table (Part 4. Finished)

Amongst many other projects, the concrete patio table is finished. The surface was polished up through 800 grit, sealed with an experimental colloidal silica topping, and then coated with the soy-epoxy. I don't know how the silica densifier and epoxy will play together. We will have to wait and see.
A shot of the bottom. Since nobody sees this I wanted some kind of texture when people put their hands underneath.
The concrete was cast right-side-up and the glass and embeds we seeded into the surface and troweled in.
I rubbed down the epoxy with fine steel wool before waxing. Stainless steel tapcons secured the concrete to the base.

Monday, May 17, 2010

Concrete Patio Table (Part 3. Grinding)

The table was demolded after 2 days. I ground the surface with a diamond cup wheel to get through all the surface paste and remove any trowel or plastic marks. White and green glass pieces were broadcast in opposite arcs across the surface.
Now that the surface is flat, it will get ground through 400 grit before filling. I will wait a couple days before flipping it over and grinding the bottom.


Saturday, May 15, 2010

Concrete Patio Table (Part 2. Placing Concrete)

After a few more cans of spray foam and sanding, the shape was pretty close. This reminds me of building the molds for concrete canoes, although on a much smaller scale. The bottom square is the 3" mounting base. Then the table underside tapers from 2 inches thick in the middle to 1 inch at the edge. Since the foam is hard to get real smooth and with a short time frame to get this done, I lined the mold with plastic. It will either 1. look cool, or 2. need a bunch of grinding to smooth the bottom side.
I cut some tile backer steel mesh to insert into the top. This won't provide any extra strength, but will help keep any cracks tight. Like most concrete designs this hopefully shouldn't do anything and is there should cracks form.
Now is that concrete green enough for you? This is a modified version of my now standard self-consolidating mortar that has been working well. This mix is a high strength 2.5:1 sand to cement mortar at a 0.4 water to cement ratio. The concrete was produced using white cement, high range water reducer, air entrainer, and both cellulose and polypropylene fibers. The green pigment was dosed at 3% by weight of cement.
I seeded some white and forest green glass into the surface and broke down and put some Cheng fossils into the surface. With all of the fibers there will be more than a little grinding and torching to get the surface smooth.

Sunday, May 9, 2010

Concrete Patio Table (Part 1.2 Mold Making)

The mold forms completed and starting to fill in the taper for the base. The first layer is cheap foam. The square bottom is the 3" base and will taper to 1" to the outer edge.
I am using spray foam to create the taper. It gets sprayed, struck off, and then sanded smooth.

Monday, May 3, 2010

Concrete Patio Table (Part 1 Mold Making)

This weekend I finished the second planter and started the mold for the patio table. These had about $10 in mold materials, $10 in concrete, $30 in stainless screws, and $30 in wood. I am going to use the basic mold again to make a bench or two. Since these molds were completely assembled using silicone and no screws, they can be reused over and over.
Very cool with the horsetail reeds.
The far planter has recycled glass tiles and the near planter has white and green crushed glass.
The table will be 40" round and will taper from 3" in the middle to 1" at the edges. The base is a $4 piece of floor underlayment. The sides are strips of 1/4" fiberboard. This mold will continue the screwless theme that has been working so well. Notice on the supports I put some masking tape. It holds well and makes cleanup a breeze. Just peel off and throw away.

Sunday, March 28, 2010

Concrete Planter Project (4. Finished)

Concrete ends with recycled glass tile scraps coated with soy-based epoxy. Scrap Ipe wood middle from a local rainscreen manufacture sealed with soybean oil.
Cutout detail for mounting the wood.


Friday, March 19, 2010

Concrete Planter Project (3. Finishing)

I stripped the forms two days after placing. When I strip the forms at 1 day, even with high strength concrete, the finish isn't as good as at 2 days. It took about an hour to grind through 50, 100, 200, and 400 grits. Since these are going outside I didn't feel the need to go any smoother.
Straight out of the forms, pretty grey and boring.
The glass tile pieces after grinding.
They got sealed with the soy epoxy I used on the fiber optic buffet top. It is semi-penetrating and provides a nice wet look. The triangle-shaped holes are handles.
I am waiting on the hardware to put everything together.

Monday, March 15, 2010

Concrete Planter Project (2. Concrete)

The concrete planter ends are progressing. All the joints got filled with silicone and a glass tile design was put into the front.
The mix was a quikrete 5000 base with 50% latex modifier. I used water reducer to bring the w/c to 0.4. It also had some fibers and a little bit of black pigment to make it a little darker. Here is my simple setup, complete with the bathroom scale and cat litter buckets.
I use two types of fibers. The left is a fibrillated (think fish net) polypropylene. The right is a cellulose fiber let over from making furnace filters and dusters. The little packets break up into individual fibers. Since I don't use any reinforcing steel, these will keep any cracks small. These planters won't ever be in tension so I probably don't need any fibers.
With the high range water reducer the concrete has the consistency of stiff honey. A little hand vibration and it flows. It needed to be flowable to get under the mounting lip for the wood boards.

Wednesday, March 10, 2010

Concrete Planter Project (1. Mold Making)

The recent warmer weather has a few projects starting around the house. I am building raised beds for the garden out of ipe wood and have some extra material. I have enough extra to build a couple concrete and ipe planters. Ipe is a very hard, very dense tropical wood that makes great patio furniture.
Mold making for concrete countertops/projects has evolved recently (past 10 years). Cheng started using particle board and laminate then switched to melamine. Every project used fresh mold materials and used lots of drywall screws to keep things from moving. Lately Cheng has switched to foam boards secured with tape. Many other mold builders have switched to foam board and thick vinyl tape for lining the molds. Others have switched to fiberglass or flexible urethane molds. It turns out that most of the older style molds were over-built and wasted too much material. I have built a couple molds lately with little to no screws.
Here is one of the end molds for the concrete planter. It is basically square with knockouts to secure the wood pieces and a handle indentation. Other than a few leftover screws holding together the bottom knockout, there aren't any in this mold.
For the sides I cut the bottom melamine used for the fiber optic topic and sealed the ends with polyurethane. The mold pieces are held down with silicone caulk. Brown was on sale. The knockouts are just leftover plywood coated with polyurethane.
Instead of screwing the braces into the bottom piece and sides, they are secured with caulk too.
A couple minutes later the mold is complete. I let the caulk dry and then fill the seams. After casting the concrete everything comes apart and cleans up easily.
These ends are 4 inches tall and will be held just fine with caulk. The fireplace mold was secured with caulk because I didn't want to drill into my floor. That was 12 inches tall and didn't move at all. Using this technique I can reused my mold pieces and the bottom won't have a scratch.

Monday, March 1, 2010

It's Winter, blah!

I haven't posted in a while because, well it's winter and I haven't done anything. Spring is getting close and thoughts of drinking on the patio are surfacing. One of the first projects for the new year is a table for the patio. I picked up this tulip base last year. It is going to get a green concrete top. I am toying with the idea of embedding steel and letting it rust through the surface.