
Wednesday, December 9, 2009
Concrete that looks like, asphalt?
A month or so ago Studiobuild was contacted by a Ferrari race team to make a couple trophies for their series championship. The catch was they wanted the bases made out of asphalt. Besides my aversion to asphalt, the logistics of an asphalt trophy just didn't' work. So I suggested the next best thing, a concrete base the looks like asphalt. Jerad made the mold and I went to work on the mix. I took a superpave asphalt mix design and substituted black cement paste with appropriate viscosity for the liquid binder. I even compacted them with a Marshal hammer. After coating with a high gloss sealer, the results look just like asphalt. Never thought I would imitate asphalt with concrete, but it worked quite well.
Monday, November 23, 2009


Friday, November 20, 2009
Sealing the Concrete Buffet Top
I have been falling behind on blog posts with our house being on a homes tour, traveling, and school. Meanwhile the concrete buffet top has been sitting and waiting in the garage. Pretty much all of the finish work has been completed so it getting old didn't impact grinding. Although at this point there isn't anything you could do other than burn up pads.
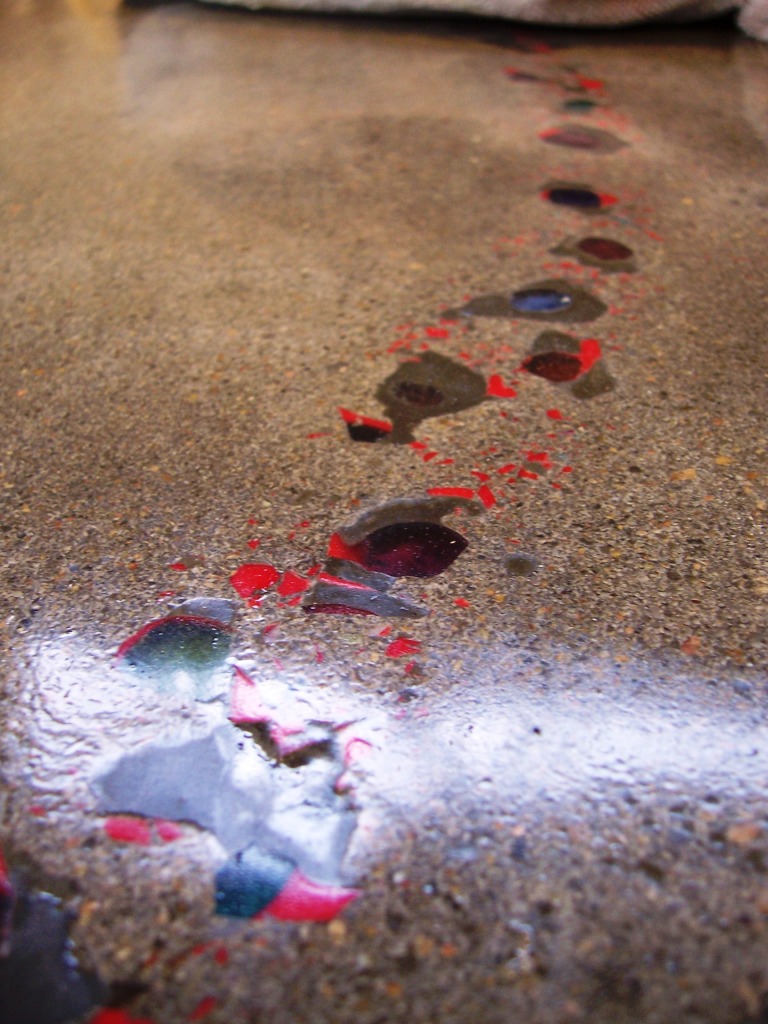
Here is a shot of the crushed Murano glass in the surface. The big pieces are all back-lit with fiber optics.
 My cat Portland supervising.
 I haven't found a sealing method that I really like. I have tried the Cheng sealer with wax, just wax, and acyclic. None do a good job of penetrating and bringing out the color. I like the idea and durability of traditional epoxies, but they make the concrete look like plastic. I am experimenting with a soy-based eco-friendly epoxy. It is supposed to bring on the color and not make the concrete look like plastic and be UV stable. It mixes in two parts like epoxy but is really thin. There is no odor at all, which is good for inside work.
 Here is the applied product. I tried a roller and a brush. It went on a little streaky and became more uniform during drying. I am going to give it a day or so before making a verdict, although so far so good.
Thursday, October 8, 2009
Buffet Top Reveal
The stripped buffet mold. The flowable concrete produced a very smooth texture with very few bugholes, just a couple on the edge.
 The fiber optics all stayed in place. I used a razor blade to cut the fibers flush with the concrete.
 Now it is curing under wet plastic before grinding.
Sunday, October 4, 2009
Placing the Fiber Optic Concrete
The fiber optic buffet mold has sat covered in the garage for a couple weeks due to some other more pressing things. Today I got back to it.
Finished gluing the fiber optics in.


Some of the first ones came loose. The ones in the mold were fine but the ones glued to the glass pieces came off. I used more hot glue on this round and everything seemed to hold better.
 After finishing the mold I was so close, so I whipped up a batch of mortar. Regular concrete would be too stiff and hard to consolidate around the fiber optic lines. There really isn't a good way to consolidate without breaking them loose. The mortar mix I decided on was very fluid. This mix didn't require any consolidation and was self-leveling. It is pretty simple and worked very well. I will probably be using some variant of this on some future projects.
Here are the specs:
- 2.5:1 sand to cementitious materials,
- 5% metakaolin clay,
- 0.4 water-to-cement ratio,
- 1:1 latex admixture to water,
- 3 pcy cellulose microfibers,
- 1.5 pcy polypropylene fibers, and
- a ton of high-range water reducer
I have had problems in the past with the cellulose fibers not dispersing in mortar mixes due to the lack of coarse aggregate. The sand, water, and fibers mixed for 10 minutes before starting to mix the concrete. That seemed to get everything broken up correctly.
 I let the mix come to level and let it hang out for an hour or so to begin setting up.
 After the concrete stiffened some I was able to lay over the fiber optic lines with less chance of pulling them loose. I laid a couple boards on the mold to help keep the fiber optics pointed in the right direction. The plan is to tape them to the bottom of the mold to hold everything in place. I also lightly troweled down any bumps.
 It didn't feel like a pulled any fiber optics loose, but we will have to wait and see. Since I didn't vibrate the concrete at all there may be some extra bugholes. Stay tuned.
Thursday, September 10, 2009
Fiber Optic Concrete Progress
The mold construction for the fiber optic bar/buffet top is coming along. I taped off the bottom, drew an abstract shape, cut out the shape, and glued in crushed glass. I almost cried while making the crushed glass out of a broken Murano glass lamp from Italy. It even had the master's signature but was unsalvagable as a lamp. The bigger pieces were glued in with a drop of epoxy and the little pieces sprinkled on after spray adhesive. What is the weird frame you ask, hold tight.
 Here is the fiber optic setup. The bottom piece is the led light generator and the black encases all the fiber optics.
 I bought a multi-strand setup that had small, medium, and large fibers. I cut enough to run into the cabinet and split the case open.
 The bigger fibers got attached to the larger glass pieces to make them glow. I just attached them with hot glue. I will have to be careful placing the concrete, but they seem secure.
 The strap is there to keep the fibers out of the way. I drilled very small holes into the white part of the mold and have been inserting the smaller fibers. This is a very time consuming process. It will be cool when finished and I can't rush otherwise the fibers will come loose.
Tuesday, September 8, 2009
Fiber Optic Illuminated Concrete Bar Top Project
The next concrete project is underway. This is a top for a bar/buffet. The concrete will be regular grey with crushed Murano glass and fiber optics.
The mold is pretty standard construction, 3/4" melamine with caulked edges. I only had white caulk so it blends in. The dimensions are 62"x13"x2".

The shape of this piece is pretty straightforward, however I am trying a few new techniques on this one. An abstract shape was drawn on painters tape and removed. Spray glue will be used to seed the red crushed glass in this pattern. The fiber optics will be glued to the back of the crushed glass in this section so the shape will glow through the glass.
 I picked up some highly recommended low VOC semi-penetrating epoxy for this top. I haven't been real happy with the sealer/wax setup and don't like the thickness of traditional epoxy. Hopefully this new type will be the answer, stay tuned.
 Thursday, September 3, 2009

Sunday, August 23, 2009
Finished: White Concrete Desk Project
The white concrete desk is completed and installed. The cobalt blue and green bottles with the white sand and cement really pops.
 The hole for the computer cables was drilled after the desk was installed. I was concerned about the hole breaking during installation otherwise. Some minimal fitting was required to get everything to slide into place.
 A completed, very cool, built-in desk.
 Next Project: Illuminated bar top
The next project is going to be a bar/buffet top with crushed glass and fiber optic lighting.
Sunday, August 9, 2009
Finishing the White Desk
The white concrete desk was placed two weeks ago. Form were stripped after 4 or so days. Initial grouting was done at 4 days and moist cured. Initial grinding 50 and 100 grit was done at 7-days. A second thinner grout was applied with a rubber trowel. The countertop was moist cured for another 7-days until polishing. At 14 days after placing the top was polished through 1500 grit. So the full polishing scheme went 50, 100, 200, 400, 800, and 1500. I skipped 3000 grit since the sealer doesn't really stick to it. Four coats of sealer went on today. The sealer will cure for another day (it is really hot and humid in the garage right now) and will get waxed before installation.

Monday, August 3, 2009
Desk Progress
The desk got one thick coat of slurry right after the forms were removed. Then the top was ground through 50 and 100 grit before applying a second much thinner coat. It will cure another week before beginning to polish. All of the glass stayed in placed and looks good.

Thursday, July 30, 2009
White Concrete Desk Reveal
One of the characteristics that helps lighten white cement is fine grinding, even finer than Type III high early strength cement. I will vouch for that. This countertop was hot to the touch 6 hours after placing. Good news is that it can be finished much sooner.
The desk proved difficult to strip the forms since the aggregate was glued in place. The glass stayed in placed and was well distributed across the surface. In this picture I started slurry coating the surface to fill the holes left from the curved part of the glass. In a day or so it will get a grind with 50 grit and then another slurry coat.

Monday, July 27, 2009
Placing the White Desk
To get the colored glass, blue and green wine and beer bottles were soaked in water to remove the labels then crushed and rewashed. The mold was sprayed with glue to hold the glass in place.
 All the ingredients, all white. Sand, cement, metakaolin, and latex.
 I stripped a couple sides. It will cure under a wet towel for four days before grinding and another week before polishing.
Saturday, July 25, 2009
White Desk Project
Everything has been prepared for the white desk. The mold is a pretty standard construction. I had some leftover MDF so I used that and spray painted to seal the wood. The desk has a thickened front edge to cover the in-place frame.
The desk will be white concrete with crushed glass in the surface. I saved some good blue and green bottles. First they were soaked in water to remove the labels, then crushed with a hammer to the appropriate size. Beer bottles can be problematic if not cleaned properly. The sugars in the beer tend to retard the concrete set. These were washed again after crushing.
 How do you make white concrete, mmm use white cement. This is a little harder to track down for the average person since Home Depot doesn't carry it. Masons and stucco guys use white cement or call your local decorative supplier. This cement and sand was donated by Mike Murry at Decorative Concrete Supply. The only real difference between white and regular Portland cement is they leave out the tetracalcium aluminoferrite. It is a small part of regular cement that doesn't really contribute to strength.
  Another concern for making white concrete is the aggregate. Regular sand tends to make the white cement concrete a tanish color. You can buy pure silica sand (ash tray sand) at local suppliers. Since this is a small desk, shrinkage isn't really a concern so a mortar mix is appropriate.
How do you make white concrete, mmm use white cement. This is a little harder to track down for the average person since Home Depot doesn't carry it. Masons and stucco guys use white cement or call your local decorative supplier. This cement and sand was donated by Mike Murry at Decorative Concrete Supply. The only real difference between white and regular Portland cement is they leave out the tetracalcium aluminoferrite. It is a small part of regular cement that doesn't really contribute to strength.  Another concern for making white concrete is the aggregate. Regular sand tends to make the white cement concrete a tanish color. You can buy pure silica sand (ash tray sand) at local suppliers. Since this is a small desk, shrinkage isn't really a concern so a mortar mix is appropriate.
 The mix will be a standard mortar mix; 2.5:1 sand to cement, water-to-cement 0.40, 10% metakaolin clay, high range water reducer, viscosity modifier, latex, polypropylene fibers, cellulose fibers, and de-air entraining agent. The total batch will be 1.0 cf.
Wednesday, July 8, 2009
White Concrete Desk Project
Since the last project was black, time to do something white. We built a closet in our guest bedroom and left room between the window and the closet for a built-in desk. The room is green with orange accents and blond birch trim. The plan is to build a white concrete countertop for the desk with exposed blue and green recycled glass.
Below is the black fireplace with the slate tile and new carpet.
 Wood strips were secured to the studs to support the plywood top and eventually the concrete. There is a hole in the back right for cords. The countertop will be 1 1/2" thick and cap the front to end up flush with the wall.
 Truly white ground concrete is a difficult animal. First, you have to use white cement. Second, traditional aggregates have color and tend to make the concrete grey or tan, so you have to use something else. This mixture will be a mortar (no coarse aggregate) and have white cement with pure silica sand. Silica sand is often used as ashtray sand. Some metakaolin clay (a bone white SCM) will add strength. Blue and green bottles will be crushed and laid into the surface. It should produce an interesting effect.
Friday, June 19, 2009
KC Home Design Awards
Here are a couple pictures of the awards I have been studiobuild with for Kansas City Home Design Magazine.
The concrete/mortar for the regular awards has a little higher paste content than normal with a little silica fume for higher strength. There is also a ton of non-chloride accelerator so we can demold them quickly. They achieve over 4000 psi in four hours.
The Ed Tanner awards are 100% crushed glass (beer bottles from my garage) with a blend of slag and fly ash. Since there is no cement, the slag was heat activated to achieve the desired strength.


Thursday, June 4, 2009
KC Home Design Awards
Although I can't show any pictures yet, recently I have been assisting StudioBuild making awards for the KC Home Design Magazine Design Excellence Awards. There are first, second, and third place awards in 17 residential and commercial categories such as "Outdoor Spaces." The awards are a combination of concrete and wood. A special concrete mixture was designed that achieves over 4000 psi in 4 hours and will have an ultimate strength above 20,000 psi. Since the awards are not a typical concrete shape, the ultra high strength will keep them from breaking should someone drop theirs.
Saturday, May 23, 2009
Equipment Upgrade
I was bursting at the seams with the old electric mixer. This week I picked up a 5 cf gas Ward gas mixer. The motor needs to be replaced but everything works and it is pretty clean. This should speed up future projects.

Sunday, May 17, 2009
Fireplace Results
The fireplace surround is done. It took longer than expected because I couldn't seem to get just the right black color. The concrete itself was black then I acid stained it black again. That still wasn't as jet black as I wanted so I used a couple coats of a very strong dye. Once the dye dried I sealed it with an acrylic. Since no one will be eating off of it, hopefully, the sealing materials don't have to be food-grade. Before
 After, a little taller and wider and filled in that weird gap near the wall.
 One layer of tile will go around the fireplace and then a stainless steel insert and fireglass.

Before After, a little taller and wider and filled in that weird gap near the wall. One layer of tile will go around the fireplace and then a stainless steel insert and fireglass.Monday, April 27, 2009
Fireplace Surround Progress
Here are the finishing steps and the current progress;
1. Strip the forms
2. Thick slurry coat to fill the large bug holes
3. Quick grind 50 grit through 200 grit (about 30 minutes)
4. Light slurry coat
5. Quick grind quick grind 200 grit through 400 grit (about 30 minutes)
6. Spot slurry as places that are still low
7. Finish grind at 400 grit (about 30 minutes)
8. Seal and wax
9. Lightly rub with steel wool to remove the shine
 Really this project hasn't taken much time or money. The mold only took a few hours to build and get in place. The concrete was 6 bags of quikcrete at $4.50 each, 3 gallons of latex at $10 each, $10 worth of pigment, and about $10 for reinforcing steel. The concrete placement only took about 4 hours from buying the materials to setting up, placing, and clean up. The real cost was the dry grinding setup since most people are against wet grinding in their living rooms. Although if you are planning on two or more project, the speed and cleanliness of the dry setup is well worth the money.
Subscribe to:
Posts (Atom)


