Friday, June 19, 2009

KC Home Design Awards

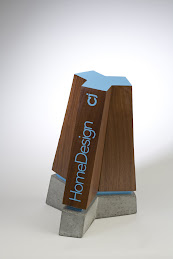
Here are a couple pictures of the awards I have been studiobuild with for Kansas City Home Design Magazine.
The concrete/mortar for the regular awards has a little higher paste content than normal with a little silica fume for higher strength. There is also a ton of non-chloride accelerator so we can demold them quickly. They achieve over 4000 psi in four hours.
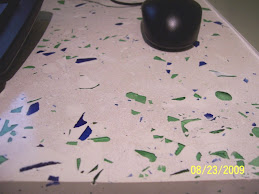
The Ed Tanner awards are 100% crushed glass (beer bottles from my garage) with a blend of slag and fly ash. Since there is no cement, the slag was heat activated to achieve the desired strength.


Thursday, June 4, 2009

KC Home Design Awards

Although I can't show any pictures yet, recently I have been assisting StudioBuild making awards for the KC Home Design Magazine Design Excellence Awards. There are first, second, and third place awards in 17 residential and commercial categories such as "Outdoor Spaces." The awards are a combination of concrete and wood. A special concrete mixture was designed that achieves over 4000 psi in 4 hours and will have an ultimate strength above 20,000 psi. Since the awards are not a typical concrete shape, the ultra high strength will keep them from breaking should someone drop theirs.

Saturday, May 23, 2009

Equipment Upgrade

I was bursting at the seams with the old electric mixer. This week I picked up a 5 cf gas Ward gas mixer. The motor needs to be replaced but everything works and it is pretty clean. This should speed up future projects.

Sunday, May 17, 2009

Fireplace Results

The fireplace surround is done. It took longer than expected because I couldn't seem to get just the right black color. The concrete itself was black then I acid stained it black again. That still wasn't as jet black as I wanted so I used a couple coats of a very strong dye. Once the dye dried I sealed it with an acrylic. Since no one will be eating off of it, hopefully, the sealing materials don't have to be food-grade.Before
After, a little taller and wider and filled in that weird gap near the wall.
One layer of tile will go around the fireplace and then a stainless steel insert and fireglass.

Monday, April 27, 2009

Fireplace Surround Progress

Here are the finishing steps and the current progress;
1. Strip the forms
2. Thick slurry coat to fill the large bug holes
3. Quick grind 50 grit through 200 grit (about 30 minutes)
4. Light slurry coat
5. Quick grind quick grind 200 grit through 400 grit (about 30 minutes)
6. Spot slurry as places that are still low
7. Finish grind at 400 grit (about 30 minutes)
8. Seal and wax
9. Lightly rub with steel wool to remove the shine
Really this project hasn't taken much time or money. The mold only took a few hours to build and get in place. The concrete was 6 bags of quikcrete at $4.50 each, 3 gallons of latex at $10 each, $10 worth of pigment, and about $10 for reinforcing steel. The concrete placement only took about 4 hours from buying the materials to setting up, placing, and clean up. The real cost was the dry grinding setup since most people are against wet grinding in their living rooms. Although if you are planning on two or more project, the speed and cleanliness of the dry setup is well worth the money.

Friday, April 24, 2009

Finishing the Concrete Fireplace

After curing under plastic and wet towels for four days the first slurry coat was applied to fill in the largest bug holes and honeycombing. A light grind will knock down any high places. A second slurry will fill in any places that still need it.
Since there isn't a good way to wet polish concrete inside, the fireplace will be dry polished. The dry polishing setup uses a low-speed grinder with hot-pressed pads and a dust shield. This method is much faster and cleaner than the wet method.
Starting on the front corner.

Tuesday, April 21, 2009

Concrete Fireplace Surround Reveal

After two days of curing in the mold, under plastic, and under wet towels the forms were carefully removed. As expected there were a few places that had honeycombing and need some slurry. The larger proportions make the fireplace stand out better.
Some honeycombing under the braces used to hold the mold together.

The concrete after a batch of colored slurry. The slurry was made using the same proportions of cement and pigment held together with just enough latex.

It is a little splotchy as the slurry dries. Another coat or two of slurry will be required to completely fill in all of the bug holes and honeycombing. A light grind will smooth the surface back out.