Showing posts with label Precast concrete countertops. Show all posts

Tuesday, April 21, 2009

Concrete Fireplace Surround Reveal

After two days of curing in the mold, under plastic, and under wet towels the forms were carefully removed. As expected there were a few places that had honeycombing and need some slurry. The larger proportions make the fireplace stand out better.
Some honeycombing under the braces used to hold the mold together.

The concrete after a batch of colored slurry. The slurry was made using the same proportions of cement and pigment held together with just enough latex.

It is a little splotchy as the slurry dries. Another coat or two of slurry will be required to completely fill in all of the bug holes and honeycombing. A light grind will smooth the surface back out.

Placing the Concrete Fireplace Surround

The fireplace surround had reinforcing steel mesh embedded 1-inch into the surface. Since it is such a long piece (about 7 feet) which is restrained by the existing fireplace, the steel helps prevent shrinkage cracking. Even though the carpet here will get replaced it was covered with cardboard. Integrally mixed concrete pigment will stain pretty much everything.
The setup in the garage. The fireplace took 3.3 cubic feet of concrete so two different batches were required. The mixture was a modified quikcrete mixture containing lower w/c, latex, high range water reducer, viscosity modifier, fibers, and pigment.
Same mixer as last time, still too small. Each batch was 1.65 cubic feet.

The mixture was self-consolidating to minimize honeycombing against the small gap between the mold and the fireplace.


The surface was hard-troweled and covered with plastic.


And covered with wet towels for a couple days.

Sunday, April 12, 2009

Concrete Fireplace Surround

The next concrete at home project is replacing this beige tile fireplace surround with a concrete one. The surround will be flat black concrete and be a little thicker and taller than the current version. Afterward the gas log will be removed and replaced with a low profile burner and crushed glass. The tile was held on with a combination of mortar and construction adhesive. Either way the underlying material is very rough and will create a great bond with the new concrete.
Pretty standard melamine construction. This mold used (2) 24"x48" pieces which cost about $20.
The new concrete will be about 1 1/2" out from the original. Because of the small clearance the concrete will have a maximum aggregate size of 3/8" to allow placement.
Since the floor is concrete and I did not want to drill into the slab, the mold has feet out from the front and back. Silicone adhesive was used to seal the mold to the concrete and glue it into place. It will be fine as long as the concrete is not vibrated too much during placement. In order to accomplish this, the concrete for this placement will be self consolidating.
Due to the upcoming volume of pieces that will be created this summer I have started modifying a prebagged quikcrete mixture for various applications. By adding additional supplementary cementitious materials, admixtures, and fibers I have created mixtures both for inside use and outside. Once the testing matrix is complete I will post the results of my research.


Monday, March 2, 2009

The Concrete Sink Reveal

The concrete sink forms were removed after 1-day. The bottom was lightly ground to ensure a flat surface.

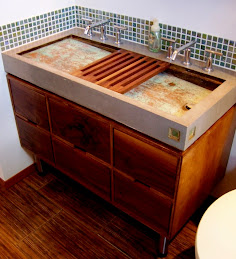
After carefully removing the forms, here is what the sink looks like. Like any new baby, fresh concrete items rarely look that good. The integral grey dye ensured the mixture had a uniform color. This sink has two faucets and a flat bottom that slopes to a single drain. The inset ledges are there for sliding removable countertop pieces. The bottom of the sink will be copper and will not get all that much finishing.
The piece in front is part of the matching backsplash. Since this was a mortar (no coarse aggregate only sand), cube samples were placed to determine the rate of strength gain.
Notice the front inside lip of sink. A portion of the concrete chipped and will require some filling. Some chipping is normal and can be easily repaired.
Individual tiles which match the shower surround were inlaid in both the backsplashes and the corner of the sink. The left side shows the blue foam used to hold the tile onto the mold. The right side shows the inlay after a little cleaning.
The sink will be covered with wet towels for 7-days to allow the concrete to cure. At 7-days the concrete is soft enough for initial grinding to reveal any aggregate. Since this mixture does not contain any aggregate it will only be lightly ground to make a smooth surface.

Friday, February 27, 2009

Placing the Concrete Sink

One thing to remember out pouring a counter countertop is that your mold should be properly supported and level. A couple sheets of plywood over some sturdy sawhorses will do the trick. I built a rolling table with leveling adjusters.
Alright, double check that all of the materials are weighed out and ready to go. I have a mixer, but if you don't they are cheap to rent at the local hardware store.

*Important note: The mixture should be large enough for the batch of concrete you want to make. Mine was a little too small and I paid for it with poor mixing. I ended up adding more water and water reducing admixture to get things mixed.
The concrete was placed into the forms by hand being sure to press the first layer in well. That prevents air pockets on what will be the surface. A pad sander without sandpaper works well to vibrate the sides.
Since the concrete did not get mixed well, we had to pick out the clumps. Although you can not see them in the final piece, poor mixing lowers the strength and makes cracking more likely.
The foam knockouts can float up in the concrete. Some scrap wood and weights kept them in place. Concrete countertop mixtures are much stickier than regular sidewalk concrete. This is from the water reducing admixtures and the fibers. While these add strength, you must make sure the concrete is consolidated around all of the corners in the piece otherwise it will not look like what you designed.
After placing the concrete got covered with damp towels to provide moisture during initial hydration.

Then everything got wrapped in plastic and hung out for one day. The longer the concrete stays in the mold, the stronger it will be. One to four days is typical to let it cure before taking off the forms and starting the finishing process.