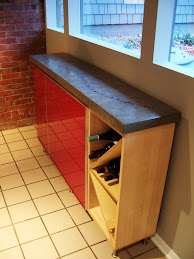
In the previous post I mentioned adding a super absorbent polymer (SAP) to the mixture to improve curing and eliminate having to put plastic on the fresh concrete. I have been using SAPs for a number of years in traditional concrete and have been very happy with the results in countertops.
A little background:
Concrete gets hard through a chemical reaction called hydration. Various cement components dissolve and recombine to make concrete hard. The ultimate strength and durability is related to the cement chemistry and amount of water in the system. Lower the water-to-cement (w/c) ratio the stronger the mixture. Unfortunately the hydration products occupy a smaller volume in their hardened state than in the fresh state, so concrete shrinks. At w/c less than 0.42 this shrinkage can be significant enough to crack the concrete from within. Also at low w/c the permeability of the hydrating paste is so low that water can't get in. If you break a low w/c mixture that has been stored in water, the middle will be dry and hydration has stopped. Hey, wouldn't it be nice if we could include some extra water in the mix that the cement can use during the hydration process? Yes and in comes SAPs.
SAPs basically soak up a bunch of water, expand, and give the water back one time. They aren't like sponges and only have a single use. Since we put more water in the mix than is needed for complete cement hydration, adding a SAP to soak up the extra water will help in the long run. The other thing needed for a good SAP is a small particle size for good distribution. Baby diapers are SAPs but the polymer grains are very large and would leave big bubbles if used in concrete. The particle size of the SAP I use is designed to work well within concrete.
The version of SAP I use is called Hydromax. You can buy a 4 lb canister for about $80 which is sized for 8 cubic yards of concrete. That one container is enough for 40 or so normal sized kitchens. The dosage rate is 2 oz per 100 lbs of cementitious material in your mixture. Just throw the SAP in with the mix and proceed as normal. It will not produce any noticeable changes in the mixture. Overall these mixtures gain strength faster, have better overall strength, and less shrinkage.
One thing to note, SAPs are very fun to play with. If your kids or drunk neighbors get ahold of them you may run out from all the experiments.
Showing posts with label Concrete Countertop Mixes. Show all posts
Showing posts with label Concrete Countertop Mixes. Show all posts
Tuesday, October 16, 2012


Wednesday, June 8, 2011
Concrete Grill Countertop
The rebuild of the built-in grill for the Big Green Egg is complete. The countertop is prebagged Type S mortar with 1:1 latex to water and the equivalent of 5 pcy polypropylene fibers. It was cast grey and then slurried with a darker Portland cement latex slurry.

A cutout was cast in place for a mahogany cutting board supplied by studio build.

Drain channels were formed under the cutting board with clay and some green color was randomly placed on the mold.

Last weekend we had a party and it seemed to get the job done.
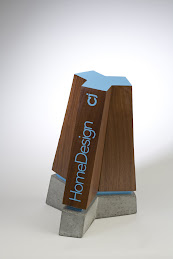
 Studio Build and I just received a job to construct 50 concrete design awards. The originals are going to be constructed from wood and cast into a polyurethane mold. Stay tuned, I am going to use it as an opportunity to refine my home made mortar design.
Tuesday, May 17, 2011
Concrete Grill Countertop Pour
Last weekend I placed the grill countertop using a fiber reinforced Type S mortar mixture. The mold had a knockout for a cutting board on the right. It is sloped to the front for drainage with some channels made from clay. The opening for the grill was split in half and wrapped with foam for easy removal.
 The mix design was pretty simple, 1 bag of Type S mortar, 1 gallon of water, 1/2 gallon of latex modifier, and 5 pcy polypropylene fibers. The latex and fibers went into a bucket and then were broken apart using the mixing paddle on the drill. The water and mortar were mixed together by hand and then the latex and fibers were added.
 All of those fibers gave it the consistency of wet manure. This was by far the cheapest countertop mixture I have ever tried.
 The mortar was pressed into place by hand. It was very workable but needed pressing because of the fibers in the mix. I sprinkled some green dye here and there on the mold surface, just to see how it would turn out.
 Finished, troweled, and resting. Since mortar isn't as strong as concrete I let everything sit 3 days before stripping the mold. Beforehand I rough ground the bottom and torched the loose fibers.
 I have been impressed. The surface texture was as good as any countertop I have produced. It is curing a few more days under wet towels before a rough grind and sealer coat.
Saturday, May 15, 2010
Concrete Patio Table (Part 2. Placing Concrete)

 After a few more cans of spray foam and sanding, the shape was pretty close. This reminds me of building the molds for concrete canoes, although on a much smaller scale. The bottom square is the 3" mounting base. Then the table underside tapers from 2 inches thick in the middle to 1 inch at the edge. Since the foam is hard to get real smooth and with a short time frame to get this done, I lined the mold with plastic. It will either 1. look cool, or 2. need a bunch of grinding to smooth the bottom side.
 I cut some tile backer steel mesh to insert into the top. This won't provide any extra strength, but will help keep any cracks tight. Like most concrete designs this hopefully shouldn't do anything and is there should cracks form.
Now is that concrete green enough for you? This is a modified version of my now standard self-consolidating mortar that has been working well. This mix is a high strength 2.5:1 sand to cement mortar at a 0.4 water to cement ratio. The concrete was produced using white cement, high range water reducer, air entrainer, and both cellulose and polypropylene fibers. The green pigment was dosed at 3% by weight of cement.
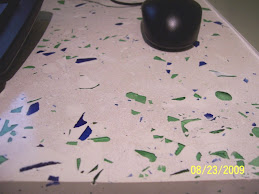
I seeded some white and forest green glass into the surface and broke down and put some Cheng fossils into the surface. With all of the fibers there will be more than a little grinding and torching to get the surface smooth.

Friday, February 27, 2009
Concrete Countertop Mixtures
There are several options for actually making the concrete for your concrete countertops.
1) Prepackage countertop mix - Buy all of the ingredients preweighed out, all you do is mix. Buddy Rhodes, Encounter, quikcrete, and regional suppliers all provide these mixtures.
2) Modified packaged mix - Buy regular outside sackcrete dry concrete and add colors and water reducers to make it work for countertops. Cheng Pro-formula is a prepackaged mixture you mix with regular 5000psi quikcrete to make a countertop. His mixture contains water reducing admixture, accelerating admixture, fibers, and color.
3) Your own recipe - With a little knowledge you can make your own.
The important aspects are workability (to get it in the forms), strength (to get it out of the forms and installed), low shrinkage (to prevent unwanted cracks), and low air content (to give a nice surface).
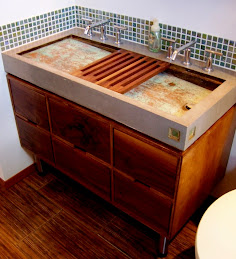
For the sink I developed my own mixture. Since it had very intricate shapes I replaced the coarse aggregate (gravel) with the same volume of sand. So the sink is actually mortar and not concrete, but for most people it is a fine line. Here is the testing summary for about 15 mixes I did. To speed up the process I was placing most of the iterations based on 1-day strength. *Remember concrete gets hard from a chemical reaction process called hydration. This process goes on forever. However, the majority of strength is gained in the first 28-days. Since the goal was to remove forms after 24 hrs, that's when I tested strength.
Testing Summary of 15 mixes:
Mixture 1 was standard Quikcrete proportions with sand instead of gravel, which contains about 540lbs of cement/cubic yard of concrete (pcy). The water-to-cement ratio (w/c) was 0.45. Lower water-to-cement generally means higher strength. I also included a deair-entraining admixture to make sure the surface didn't get holes.
1-day strength 2361 psi (pounds per square inch)
4-day strength 3393 psi
7-day strength 4570 psi (typical concrete is 4000 psi at 28-days so this is pretty good)
Mixture 2 took mixture 1 and increased the cement to 900 pcy, while lowering to w/c 0.30 with a high-range water reducing admixture (HRWR). It takes some special chemicals to lower the w/c while still maintaining workability.
1-day strength 7484 psi
4-day 8457 psi
7-day 10,582 psi (high strength concrete)
Mixture 3 maintained 900 lbs total cementitous, but substituted 15% metakaolin clay for cement. MKC is a fine white processed clay that lowers the permeability and lightens the color. This mixture also included a latex polymer to lower shrinkage and increase tensile strength. The flexural strength was improved by adding polypropylene fibers (think Easter grass) and cellulose fibers (think paper mache).
1-day strength 6391 psi
1-day tensile strength 793 psi
The ultimate mixture had good workability and strength with low permeability and shrinkage. Platinum color was added to give the sink a brighter concrete color.
1) Prepackage countertop mix - Buy all of the ingredients preweighed out, all you do is mix. Buddy Rhodes, Encounter, quikcrete, and regional suppliers all provide these mixtures.
2) Modified packaged mix - Buy regular outside sackcrete dry concrete and add colors and water reducers to make it work for countertops. Cheng Pro-formula is a prepackaged mixture you mix with regular 5000psi quikcrete to make a countertop. His mixture contains water reducing admixture, accelerating admixture, fibers, and color.
3) Your own recipe - With a little knowledge you can make your own.
The important aspects are workability (to get it in the forms), strength (to get it out of the forms and installed), low shrinkage (to prevent unwanted cracks), and low air content (to give a nice surface).
For the sink I developed my own mixture. Since it had very intricate shapes I replaced the coarse aggregate (gravel) with the same volume of sand. So the sink is actually mortar and not concrete, but for most people it is a fine line. Here is the testing summary for about 15 mixes I did. To speed up the process I was placing most of the iterations based on 1-day strength. *Remember concrete gets hard from a chemical reaction process called hydration. This process goes on forever. However, the majority of strength is gained in the first 28-days. Since the goal was to remove forms after 24 hrs, that's when I tested strength.
Testing Summary of 15 mixes:
Mixture 1 was standard Quikcrete proportions with sand instead of gravel, which contains about 540lbs of cement/cubic yard of concrete (pcy). The water-to-cement ratio (w/c) was 0.45. Lower water-to-cement generally means higher strength. I also included a deair-entraining admixture to make sure the surface didn't get holes.
1-day strength 2361 psi (pounds per square inch)
4-day strength 3393 psi
7-day strength 4570 psi (typical concrete is 4000 psi at 28-days so this is pretty good)
Mixture 2 took mixture 1 and increased the cement to 900 pcy, while lowering to w/c 0.30 with a high-range water reducing admixture (HRWR). It takes some special chemicals to lower the w/c while still maintaining workability.
1-day strength 7484 psi
4-day 8457 psi
7-day 10,582 psi (high strength concrete)
Mixture 3 maintained 900 lbs total cementitous, but substituted 15% metakaolin clay for cement. MKC is a fine white processed clay that lowers the permeability and lightens the color. This mixture also included a latex polymer to lower shrinkage and increase tensile strength. The flexural strength was improved by adding polypropylene fibers (think Easter grass) and cellulose fibers (think paper mache).
1-day strength 6391 psi
1-day tensile strength 793 psi
The ultimate mixture had good workability and strength with low permeability and shrinkage. Platinum color was added to give the sink a brighter concrete color.
Subscribe to:
Posts (Atom)