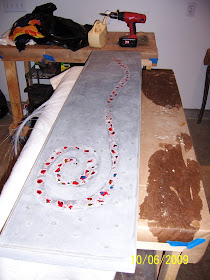
The stripped buffet mold. The flowable concrete produced a very smooth texture with very few bugholes, just a couple on the edge.
With a Ph.D. in Concrete Materials I specialize in "green" concrete, but have an affection for all things concrete. This blog will detail my exploits into all things concrete for the home.
Thursday, October 8, 2009
Sunday, October 4, 2009
Placing the Fiber Optic Concrete
The fiber optic buffet mold has sat covered in the garage for a couple weeks due to some other more pressing things. Today I got back to it.
Finished gluing the fiber optics in.


Some of the first ones came loose. The ones in the mold were fine but the ones glued to the glass pieces came off. I used more hot glue on this round and everything seemed to hold better.
 After finishing the mold I was so close, so I whipped up a batch of mortar. Regular concrete would be too stiff and hard to consolidate around the fiber optic lines. There really isn't a good way to consolidate without breaking them loose. The mortar mix I decided on was very fluid. This mix didn't require any consolidation and was self-leveling. It is pretty simple and worked very well. I will probably be using some variant of this on some future projects.
Here are the specs:
- 2.5:1 sand to cementitious materials,
- 5% metakaolin clay,
- 0.4 water-to-cement ratio,
- 1:1 latex admixture to water,
- 3 pcy cellulose microfibers,
- 1.5 pcy polypropylene fibers, and
- a ton of high-range water reducer
I have had problems in the past with the cellulose fibers not dispersing in mortar mixes due to the lack of coarse aggregate. The sand, water, and fibers mixed for 10 minutes before starting to mix the concrete. That seemed to get everything broken up correctly.
 I let the mix come to level and let it hang out for an hour or so to begin setting up.
 After the concrete stiffened some I was able to lay over the fiber optic lines with less chance of pulling them loose. I laid a couple boards on the mold to help keep the fiber optics pointed in the right direction. The plan is to tape them to the bottom of the mold to hold everything in place. I also lightly troweled down any bumps.

